2023 is coming to a close. We survived Covid….3 times, lost family, moved twice, hit snags along the way, and for some reason or another decided that staying within a cave was a better idea than to venture out and try again. What a crazy, depressing time to be alive. What a crazy 3 years
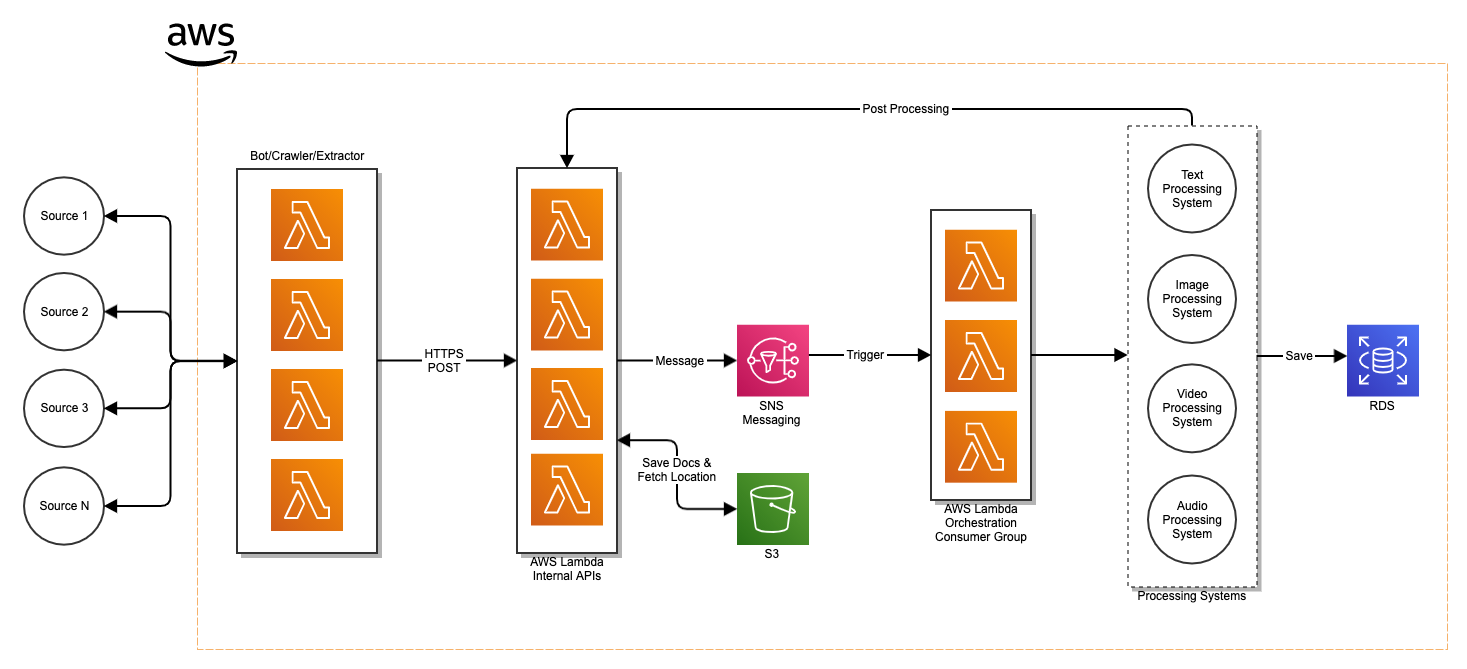
I started off by drawing plans on how to architect the Text Processor Engine (TPE) and realized I had to take several steps back and understand how the system as a whole would work. In the middle of that exercise I realized the TPE would not scale and wasn’t a very good path forward. I
Its the Data… Yes, a play on the age old, “Its the economy stupid!”. But, as I think about the Jor-El system I want to create, I keep going back to the idea that it all starts with the data. What we can build and form knowledge off of. This section will cover the data
It took a while……Family, work, and just lack of energy to start, I just feel I had to start. So, I created a comprehensive list of things I need to accomplish to get to, what I think will be a v1 of the system. Before diving into the plan I want to cover the vision/goal.
Was cleaning out a few things and ran across the below. Its from August 13th 2019. ——- A few years back I lived in San Fran. Worked for Yahoo. Now im back in SF, with a family and to be honest…feel uneasy about it all. Im sitting in the bart writing this, getting ready to
Where do I fit in the technology landscape? Im currently a Director/IC at Capital One and as I’ve grown in my career I’ve continued to dig at the question, where do I want to go, and, what does it mean to be successful there. For a long time I wanted to be a director, now,
I’ve been taking a deep dive into real time data. Specifically working with AWS Kinesis Streams. The below power point is the result of combining my curiosity into the sentiment analysis world, nodeJS, and AWS Kinesis. Hope you enjoy. [slideshare id=80155763&doc=zrno3xektwisyxz3qyyx-signature-c9fe242bd926844de1be79a3c6de0b4ebfebbf7cfcfa7ae09b39fff810cc20ce-poli-170926004452] A little about the data and calculating sentiment. The data is exclusively real-time english
When I was 10-11, not really sure how old I was to honest. I would jump on a bike and rush to play at my uncle’s farm. Cows, dogs, chickens, you name it, there were animals to play with. Aside from the animals my uncle treated me as an equal and at such a young
After a full day of trying out different approaches and realizing there are many outdated blogs/videos on how to get Unity set up for Gear VR development I thought I would publish my own version on how I got it to work. Here goes. Download Your Tools! 1. Download the latest Unity version. I’m using